domenica 5 febbraio 2023

How I made "Little Prince" in rubber foam.


Hello everyone, welcome back, today I want to show you my version of the Little Prince. In my Journal I am adding several quotes taken from the book, and some months ago I bought a Little Prince scrapbooking paper pad, I remember when I was a child I watched the anime on TV but it was different, who knows if it can be recovered on some streaming platform, I remember he was dressed in blue with a white scarf, then I bought the book and saw that it was different from how I remembered it. Anyway, I add a picture of the anime I'm talking about, who knows if there isn't someone among you who remembers it...
Anime I watched when I was a child
To create this I instead took a photo from the series that aired on Rai Yo Yo, and that I saw some time ago I don't remember if on Netflix or Prime. The same dress also had in the movie also seen that I believe on Netflix a couple of years ago.


from movie 

Someone asked me for the pattern and the video a few months ago. As I have said several times, to create a pattern I need several days and attempts, this time they were more than the previous one.

The first looks like Theodore from the Chipmunks cosplaying the Little Prince, so I did a second try while recording the video adjusting the pattern. In the video I had used a different tripod and the lights set in a different way, the fact is that I often went out of the frame and some pieces were missing, because I couldn't see if he was recording or not. So today I made the third Prince, and I glued it on the planet, on his planet with his rose, I was thinking about adding rose quote underneath, glued on a banner, I still don't know if I glue it or not. I'll see eventually I will add the photo if I decide to add quote.

In these Pictures I found in Google you can see image of movie and on right an image of the TV serie I watched on Rai YoYo surely you can find in your Country too.
Anyway I saw this dress and I tried to make similar to this.


Even failures should be shared... on the right you can see the first attempt, I'll probably take the head off and use it for another character... because I truly don't like it.

The final height is around 22cm, my characters are all more or less this height.

As for the creation of the character we always need the same tools:
  • iron
  • hot glue
  • scissors and earwigs
  • wire
  • acrylic paints
  • fine tip indelible pens
  • nippers and pliers
  • tweezers (me having chubby hands)
  • large cutter, cutter
  • 4x2.5cm eggs (preferably 2, one for thermoforming and one for cutting in half)
  • 4cm ball
  • 5cm ball
  • handmade molds or molds (optional)
  • awl or toothpick to score
  • pattern
  • foam rubber in the colors:
  1. yellow
  2. black or brown
  3. green
  4. skin color

Here are the patterns, I lengthened the trousers a bit compared to the video, both above and below because they remained open and pulling them up they seemed short, you could see the ankle, so I added 5-6mm below and above too. As I've always said, each character takes a different shape, and changes along the way...


I thermoform the arms with moulds, but I drawed it in the pattern, in the following photo you can't see them because I had forgotten to thermoform them.
  For all the characters who have a dress covering their leg you can use another color of foam rubber so you won't see it.
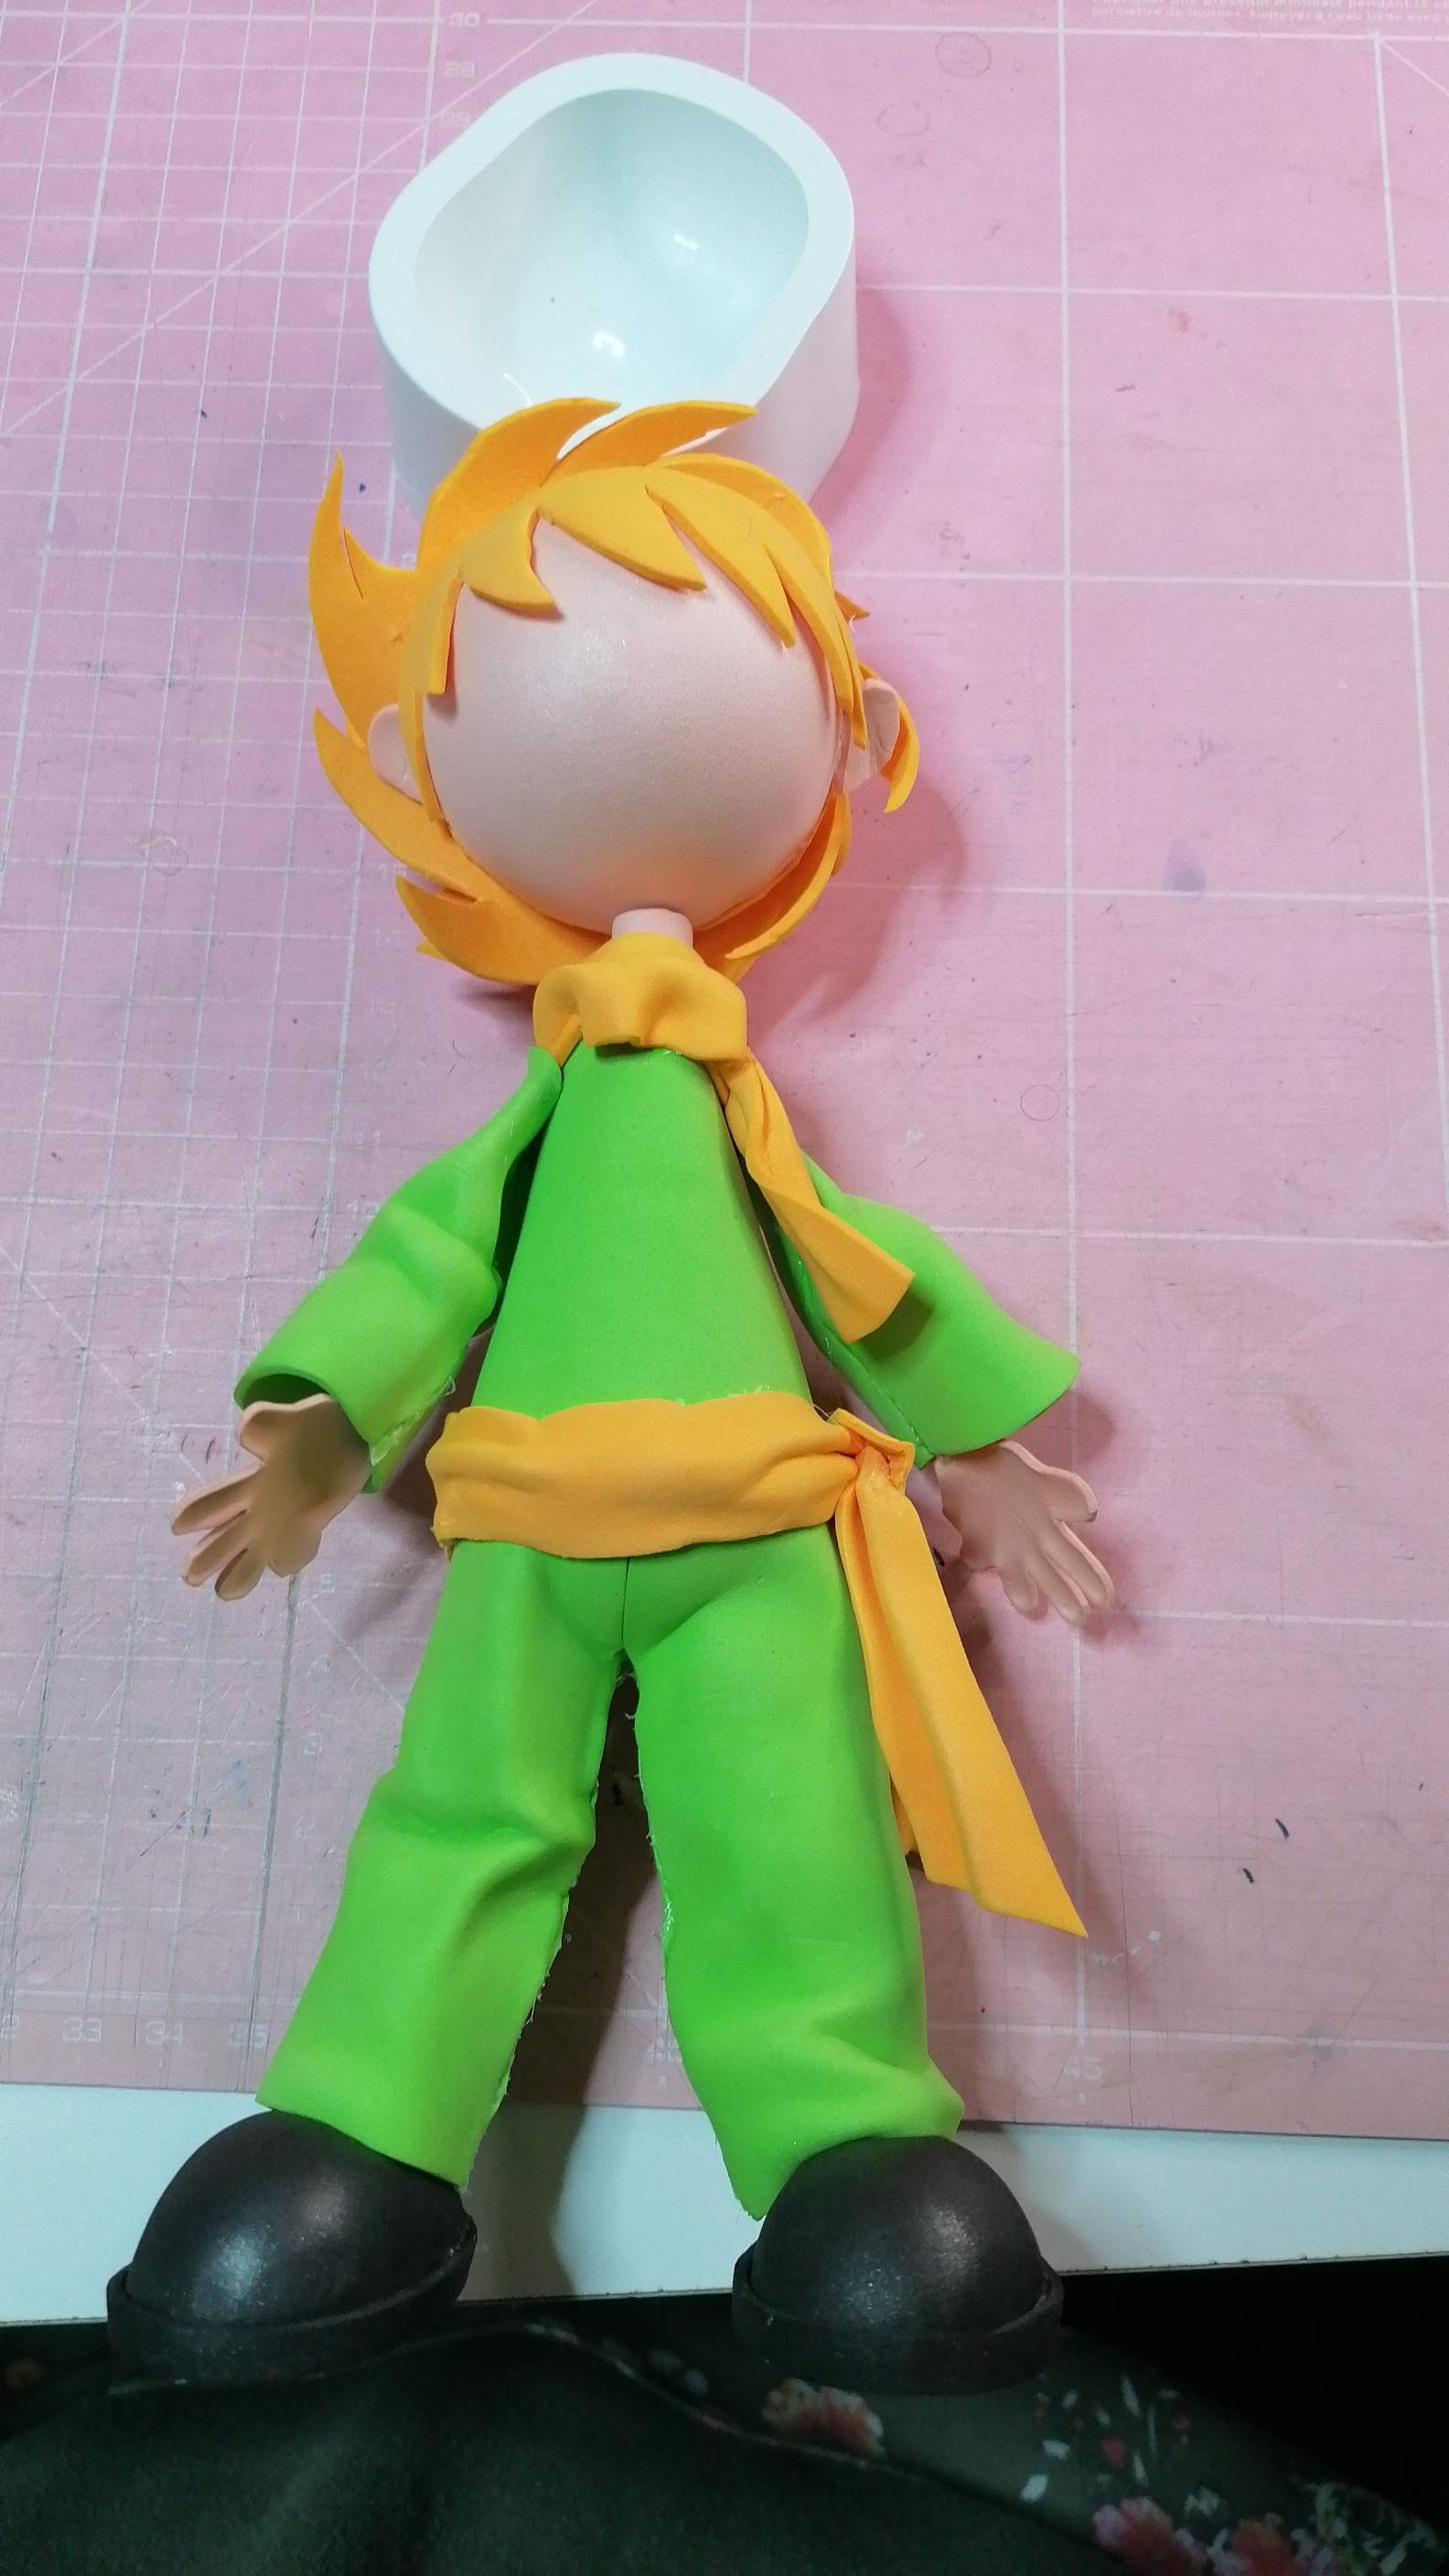
I made the sleeves like this this time, they are less thick on the shoulders. The hairstyle is what I call "very disheveled" I got the idea of doing this hairstyle looking at a die I had and I didn't know how to do the hair of my favorite character, Conan the boy of the future, although I love many other characters, that anime is in first place in my personal top list, and I wondered how to make Conan's hair messy? The little prince is not really combed, so I changed a few strands and here he is. For the belt in the video I show how I did it, or rather the part that he didn't record then I recorded it when I did the third Prince.

In the second attempt I had put the tails both on the neck, like a scarf and on the belt, in the second one only on the belt, if you decide to put them around the neck I also suggest to attach them first.

With the awl or a toothpick, mark all the pieces, which we will cut later. For the first attempt I cut gradually, but once the pattern was defined I usually cut all the pieces together and then thermoformed them all, so the iron only turns on once. Beautiful is when you have to make several subjects together that you cut everything and then thermoform everything, you save not only energy but time, a lot of time. In the photo beside the trousers that as I said before I modified, should now be right or better to fit even better. 

So once I cut all the pieces I started as usual from the feet. As I said before I keep an egg to thermoform and the other I cut it in half, to put inside the shoe. Sacrificing an egg and always keeping it to do the molding work is important in my opinion, because when we squeeze to thermoform the shoe, the underside of the egg or the sphere is deformed and therefore we risk obtaining two different feet, one higher and one lower. I also said it last time and I repeat it again today. If you want or if the work is not as precise as you wanted, add a 4-5 mm band along the circumference of the shoe.


I roll up the legs widthwise, on the pattern it shows the arrow that relates to the height and how to roll up the foam,  for the legs and for the neck/body too. We put the wire inside, 2 cm longer because one part goes into the shoe and one into the basin.

Pants, then as I said before I stretched a little in height and as a crotch because they remained open underneath, I thermoformed without using color, close in a circle and squeeze them to give the worn effect, first we glue the leg on the shoe. If you use shoe molds, ok but if you use an egg like me in the video, you have to cut obliquely from the front more so that the leg rests entirely on the shoe, for normal molds even if I still put the egg in it for support it has a straight cut and therefore the problem does not arise.
We put on the trousers and model the wire that sticks out of the legs and practice holes in the sphere that will act as a basin, turn up the trousers to better see where I'm going to glue the legs, and also to avoid dirtying the trousers with glue, then I'll try to glue the rest and close the rest of the trousers.

We are halfway through the work, I glue the body/neck always with the wire that goes for one centimeter in the sphere and then one will go to the head, I take the shirt and close it on the back then on the bottom of the shirt I put a round of glue and I glue it on the body, we take care to match the edge of the neck on the back and also match the shirt on the back.
We glue the belt and the tails, and since a little bit remains compared to the pattern I also create the knot, for the neck / scarf I didn't tie the knot I put a "tail" in front and one behind. but in the next I only put the collar, which will be glued after attaching the sleeves.

The sleeves, so I made them differently and once closed I glued the lower part on the other (higher) side and then I cut the arm as you can see in the sign made on the pattern and I glued inside the sleeve, then glued on the shoulders and then I added the collar I was talking about before.


Thermoformed the head and glued foam rubber on the polystyrene I  glue the ears and the fringe and then the disheveled hairstyle. As a hairdresser I'm not so bright, so I'm sure you'll do better than me.

I try size of the head on my character

I paint the face and finally glue the head to the neck. As I said before, I cut almost a cm of neck because it still seemed too long so compared to the pattern, about 1.5cm more, I made pattern longer than you need because it's bettere to cut later than risk to cut another piece longer.

detail scarf
For the third Little Prince I made I didn't put the pigtails around my neck but only around my waist.

How did I make the planet?

I used a half sphere of the large polystyrene ones, the ones that are made up of two parts, which I had taken years ago to make special packages for Christmas presents, never used, they are still there,, so I took one half and I used a kind of clay I have in few colors because I almost end all colours I had, this clay is  like das or fimo air, with the difference that it remains soft and "gummy" , I created the planet and then I painted, I think I will use the other colors in this way too, I have had these packs for years. I filmed making it, I'll probably make a music-only video of it and post it.
detail vulcano


is not perfect but cool

here without Little Prince 


I think it's all for the moment, I'll add other picture of Little Prince, and maybe some from video, because I didn't make picture while I was recording the video. 
I send you a big kiss. 
Lot of Love Betty.

here detail of rose

third Prince I glued on B612

Little Prince back


sabato 4 febbraio 2023

La mia versione de "il piccolo principe" in gomma crepla

Salve a tutti, bentornati, oggi vi voglio presentare la mia versione del Piccolo Principe. Nel mio Journal sto aggiungendo diverse frasi prese dal libro, e non molto tempo fa acquistai un blocco di carte a tema Piccolo Principe, Ricordo da bambina guardavo in tv l'anime ma era diverso, chissà se si può recuperare su qualche piattaforma in streaming, Ricordo era vestito di azzurro con sciarpa bianca, poi acquistai il libro e ho visto che era diverso da come lo ricordavo io. Comunque aggiungo una foto dell'anime di cui parlo, chissà che tra di voi non ci sia qualcuno che lo ricordi...

da ricerca su Google

Io per creare questo ho invece preso una foto dalla serie che è andata in onda su Rai Yo Yo, e che ho visto tempo fa non ricordo se su Netflix o su Prime. Lo stesso vestito aveva anche nel film visto anche quello credo su Netflix un paio di anni fa. 

da ricerca su Google

da ricerca su Google

 Mi era stato chiesto anche il cartamodello e il video qualche mese fa. Come ho detto più volte, per creare un cartamodello ho bisogno di diversi giorni e tentativi, questa volta sono stati di più rispetto al precedente.  
Il primo sembra  Theodore dei Chipmunks che fa il cosplay del Piccolo principe, quindi ho fatto una seconda prova mentre registravo il video aggiustando il cartamodello. Nel video avevo usato un cavalletto diverso e le luci messe in un modo diverso, fatto sta che spesso uscivo dall'inquadratura e alcuni pezzi mancano, perché non vedevo se stava registrando o no. Quindi oggi ho realizzato il terzo Principe, e l'ho incollato sul pianeta, sul suo pianeta con la sua rosa, pensavo se aggiungere una frase sotto incollata su un banner, tipo sotto la rosa tra un vulcano e l'altro... Vedrò eventualmente poi aggiungerò la foto se decido di aggiungere la frase.

Anche i fallimenti vanno condivisi... a destra potete vedere il primo tentativo, probabilmente staccherò la testa e la utilizzerò per un altro personaggio... 
 L'altezza finale è di 22 cm circa, i miei personaggi sono tutti più o meno di questa altezza.

Per quanto riguarda la realizzazione del personaggio abbiamo bisogno sempre degli stessi attrezzi:
  • ferro da stiro
  • colla a caldo
  • forbici e forbicine
  • fil di ferro 
  • colori acrilici
  • penne indelebili a punta fine
  • tronchesino e pinza
  • pinzette (io che ho le mani cicciotte)
  • taglierina grande, cutter
  • uova 4x2.5cm (preferibilmente 2 una per termoformare e una da tagliare a metà)
  • sfera da 4 cm 
  • sfera da 5 cm
  • stampi handmade o stampi (opzionale)
  • punteruolo o stuzzicadenti per segnare 
  • cartamodello
  • gomma crepla nei colori: 
  1. giallo
  2. nero o marrone
  3. verde
  4. incarnato

Avevo usato due diverse tonalità di giallo però i capelli di quel giallo troppo chiaro non mi piace per niente, quindi ho usato sia per i capelli che per sciarpa e cintura lo stesso giallo.
Ecco qui i cartamodelli, ho allungato un po' il pantalone rispetto al video, sia sopra che sotto perché restavano aperti e tirando su sembravano corti, si vedeva la caviglia, quindi ho aggiunto sotto 5-6mm e sopra anche. Come ho detto sempre, ogni personaggio prende una forma diversa, e si modifica in corso d'opera... 

Io le braccia le termoformo con gli stampi, ma il modello è questo, nella foto che segue non si vedono perché avevo dimenticato di termoformarle.
 Per tutti i personaggi che hanno un vestito che copre la gamba si può usare un altro colore di gomma crepla tanto non si vedrà.

Le maniche le ho fatte in questo modo questa volta, fanno meno spessore sulle spalle. La pettinatura è quella che io definisco "spettinatissima" mi venne l'idea di fare questa pettinatura guardando una fustella che avevo e non sapevo come fare i capelli del mio personaggio preferito, Conan il ragazzo del futuro, sebbene ami molti altri personaggi, quell'anime è al primo posto nella mia classifica personale, e mi chiesi come fare i capelli spettinatissimi di Conan? Il piccolo principe proprio pettinatissimo non è, quindi ho modificato qualche ciocca ed eccolo qua.  Per la cintura nel video mostro come ho fatto, o meglio la parte che non aveva registrato poi l'ho registrata quando ho fatto il terzo Principe. 

Nel secondo tentativo avevo messo le codine sia su al collo, a mo' di sciarpa sia alla cintura, nel secondo solo alla cintura, se decidete di metterle al collo anche vi consiglio di attaccarle prima in modo che non si vedano molto.


Con il punteruolo o uno stuzzicadenti si segnano tutti i pezzi, che andremo a tagliare in un secondo momento. Per il primo tentativo ho tagliato man mano, ma una volta definito il cartamodello sono solita tagliare tutti i pezzi insieme e poi termoformati tutti, così il ferro da stiro lo si accende una sola volta. Bello è quando devi realizzare più soggetti insieme che tagli tutto e poi termoformi tutto, si risparmia non solo energia ma tempo, tanto tempo. Nella foto qui accanto il pantalone che come dicevo prima ho modificato, ora dovrebbe essere giusto o meglio calzare ancora meglio. 

Per quanto riguarda il collo si vede che ho tagliato un pochino più corto e dopo ho tagliato ulteriormente un altro centimetro circa 
Quindi una volta tagliato tutti i pezzi ho iniziato come al solito dai piedi. Come dicevo prima un uovo lo tengo per termoformare e l'altro lo taglio a metà, da mettere all'interno della scarpa. Sacrificare un uovo e tenerlo sempre per fare il lavoro di stampo secondo me è importante, perché quando schiacciamo per termoformare la scarpa, la parte sotto dell'uovo o della sfera si sforma e quindi rischiamo di ottenere due piedi diversi, uno più alto e uno più basso. L'ho detto anche la scorsa volta e lo ripeto anche oggi. Se volete o se il lavoro non è precisissimo come volevate aggiungete lungo la circonferenza della scarpa una fascia da 4-5 mm 

Arrotolo le gambe nel senso della larghezza, sul cartamodello mostra la freccia che riguarda l'altezza e come arrotolare la gomma crepla, sia per le gambe che per il collo. Mettiamo all'interno il fil di ferro, 2 cm più lungo perché una parte va nella scarpa e uno nel bacino.

Pantaloni, allora io come dicevo prima ho allungato un po' in altezza e come cavallo perché restavano aperti sotto, ho termoformato senza usare il colore, chiudete a cerchio e schiacciate per dare l'effetto indossato, incolliamo prima la gamba sulla scarpa. Se usate gli stampi della scarpa, ok ma se usate, come me nel video un uovo, bisogna tagliare in modo obliquo da davanti di più in modo che la gamba poggi tutta sulla scarpa, per gli stampi normali anche se ci metto comunque l'uovo per sostegno ha un taglio dritto e quindi il problema non si pone. 
Facciamo indossare i pantaloni e modelliamo il fil di ferro che spunta dalle gambe e pratichiamo dei fori nella sfera che farà da bacino, risvolto i pantaloni per meglio vedere dove vado ad incollare le gambe, e anche per non sporcare i pantaloni di colla, dopo cerco di incollare il resto e chiudere il resto del pantalone. 
Siamo a metà del lavoro, incollo il corpo/collo sempre con il fil di ferro che va per un centimetro nella sfera e uno poi andrà della testa, prendo la maglietta e la chiudo su retro poi sul fondo della maglietta metto un giro di colla e la incollo sul corpo, abbiamo cura di far capitare il bordo del collo sul retro e far coincidere anche la maglietta sul retro. 
Incolliamo la cintura e le codine, e siccome un pochino rimane rispetto al cartamodello creo anche il nodo, per il collo/ sciarpa il nodo non l'ho fatto ho messo una "coda" davanti e una dietro. ma nel successivo ho messo solo il colletto, che andrà incollato dopo aver attaccato le maniche.

Le maniche, allora io le ho fatte in modo diverso e una volta chiuse ho incollato la parte più bassa sull'altro lato (più alto) e in seguito ho tagliato il braccio come vedete nel segno fatto sul cartamodello e ho incollato all'interno della manica, poi incollato sulle spalle e in seguito ho aggiunto il colletto di cui vi parlavo prima


Termoformata la testa attaccato la gomma crepla sul polistirolo provvedo ad incollare le orecchie e la frangia e in seguito la pettinatura spettinata. Io come parrucchiera sono una frana, quindi sono certa che farete meglio di me.
provo la testa se è giusta come dimensione

Dipingo il viso e infine incollo la testa sul collo. Come dicevo prima ho tagliato quasi un cm di collo perché mi sembrava ancora troppo lungo quindi rispetto al cartamodello circa 1,5cm in più di collo ci stanno.  
Per il terzo Piccolo Principe che ho realizzato non ho messo al collo le codine ma solo in vita. 

Come ho realizzato il pianeta?

Ho usato una mezza sfera di quelle grandi in polistirolo, quelle che si compongono di due parti, che avevo preso anni fa per fare delle confezioni particolari per fare dei regali di Natale, mai usate sono ancora lì specie le due più grandi, quindi ho preso una metà e con la gomma eva modellabile, che è sempre gomma crepla ma tipo das o fimo air, con la differenza che resta più gommosa e pucciosa, ho creato il pianeta e poi ho dipinto, credo che anche gli altri colori li userò in questo modo, ho queste confezioni da anni, sebbene siano chiuse ancora, credo che sia giunto il momento di utilizzarle, anche perché sono rimasti pochi colori e non le ho mai usate molto. Ho ripreso mentre lo creavo, probabilmente ne farò un video solo musica e lo pubblicherò. 


Io credo che sia tutto, per il momento, questa volta ho fatto poche foto, spero di riuscire a catturare con degli screenshot qualche punto importante della realizzazione, comunque appena il video sarà on line lo troverete qui di seguito. 
Con affetto Betty


dettaglio della rosa