sabato 18 novembre 2023

pockets made with coffee filters


 Hello everyone, a few days after the post about the embossing folders, I wanted find a way to store them at the best, and I finally succeeded 😁 Here I am back with a post,about  a video, which I  should have to edit and  to upload  two months ago. I had recorded the video in English, but I must say that my English is very uncertain so I stop several times, because you have to remember how to say that word in English...

  While editing the video I saw that the entire final part of the decoration was missing, oh my God, having changed the shot so as not to let the viewer see upside down, I realized that in many places I was out of the frame. I really don't know if everyone who makes videos uses the phone, I use a video camera and I can't find a tripod that allows me to place the camera at my head level to allow the viewer to see as if he were in my place . 😕😔 I have to show you the makeshift easel that I use in some videos and which is uncomfortable.

The process is actually very simple but I did several tests. On video I had to cut a lot, and I avoided recording the creation of all the other pockets, consider that for this reason I had files for around 1 hour and 35 minutes, then between parts removed and parts sped up I reached around 43minutes.


At the beginning I had slightly overlapped the pockets and with the subsequent layers of paper they became too many layers and it wouldn't fold, so I overlapped the book paper but it was still too thick, the third attempt is the one I show you in video. It is not the third pocket, because then you will see the photos afterwards, the single ones you see are the first attempt, and then at the end you will see the ones that are already in the journal but the third attempt was the one that decided how to do all the others. Let's say so.


I had taken these coffee filters a long time ago, I had done some attempt including a sort of mini album, no it's an insult to albums, they were 5 filters put together covered with scrap paper and tags inside the filter, made with the plastic spiral of the Lidl binding machine, which is excellent for binding photocopies for notes etc. but not really for this type of work... However, I didn't even finish it, it remained in the "we'll see" box (where I leave aside the creations that I don't like waiting for an idea that can "save" it from the garbage) I threw it away when I renovated the room creative.

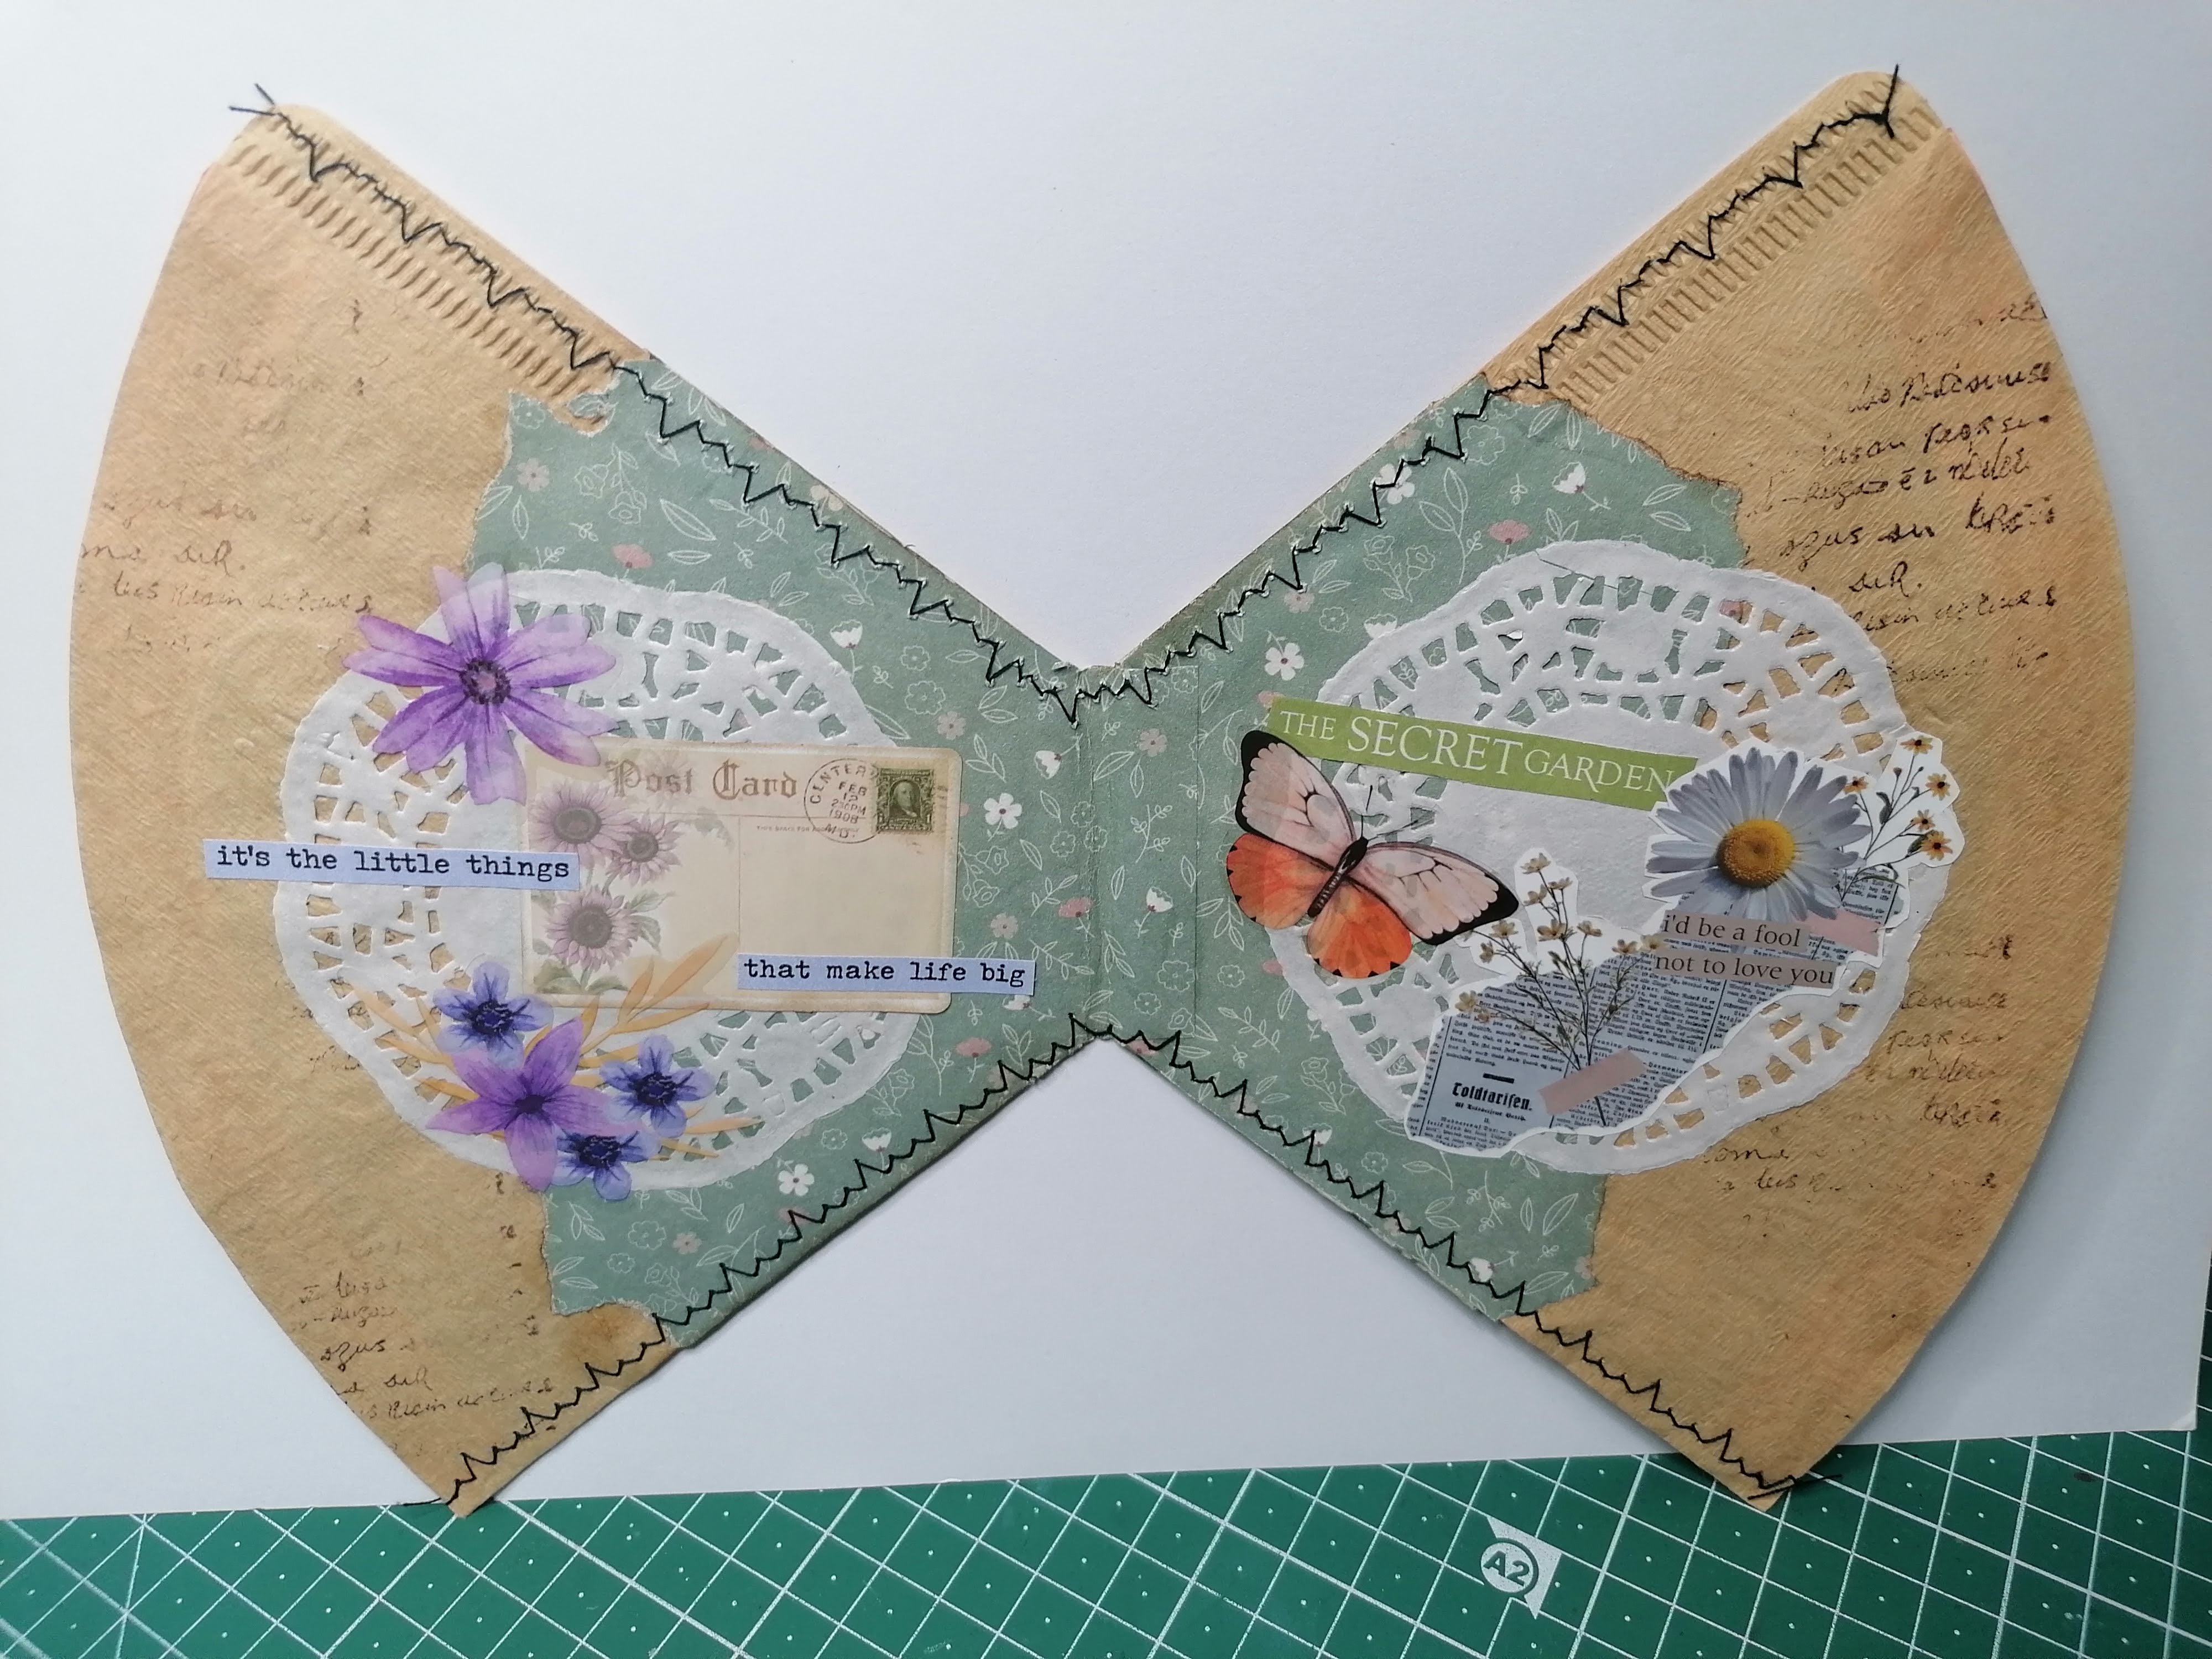
Some time later I found a video from Treasure Books that used coffee filters to make pockets and made some, this was in 2021.

Lately I've been working on a fairy themed Journal, even though I stopped because of what I call "expectation vs result" it doesn't convince me very much, I should add interesting elements, I should have added a few pages put in a particular way, add other types of paper and other elements, in the video I show a bit of the journal, the bark on the cover is probably unusual and particular, I added the lights, and I don't think that a madness like this has occurred to many...  the bark is fragile and therefore tends to break, to overcome this problem I applied a coat of vinyl glue and I think I will also apply a coat of velvet varnish to make it opaque again... Let's say that the reasons that stopped me give different, but let's go back to the pockets.

 I found the pack of filters and I said "those from Treasure books are horizontal, but I would need vertical ones in the journal, yes but how do I add them? What if I made in a way to be bind in the journals? Here's how I thought to create these pages/pockets for Journals.

In the video I also show a version with a magnet that can be added on the page before the central one or add the magnet on the page after or not include it in the binding but use it as a double pocket that "hugs" the page,


What do we need:

  • two coffee filters
  • stamps or stencils
  • ink pad (I use StaZon or Archival)
  • distress ink
  • book paper or pattern paper, or digital paper
  • paper doilies
  • glue stick and vinyl glue
  • sewing machine (optional)
  • images, stickers, labels, phrases, lace, ribbons, pastes etc. Whatever your imagination suggests to embellish the pocket based on the journal where the pocket will go.
  • magnets or even a different closure such as a ribbon...
  • In the first attempt I made (the one with many layers which I then divided into two separate pockets), I used a stencil on both sides to decorate the pocket a little, in the video I stamp a little here and there.


  • In my first attempt, as I told before, I glued too much layers and it was too thick, so I cut them as single pocket again and I embellished in this way.

    In video I stamped with clear stamps for these and others I used some stancils and distress inks


    here I added some clusters I previous made, I glued a pink doily and I will glue in journal as side double pocket or as a side and top pocket.

    here we go, let's start:

    In the video I stamped with clear stamps and Stazon (or other ink pads), here with a stancil and distress ink (walnut stain)


    These coffee filters have a sort of sewing on 2 sides, I saw that they are not exact so you have to put these sewing sides in the same direction. 
    In next photo you can see what I mean. 


    I do in this way, but if this pocket goes in a binding, can be optional, ad example I made a double pocket like this to add at the page of the journal not in the binding, adding a magnete, and there you see if they don't go in the same direction.

    Then I add book page or digital paper, I used paper from a pad purchased from Shein.

    The process is a little complex to explain, but really simple to do , I hope that with the next photos it can be clearer, even if you haven't seen the video you can understand how I did it.


    I rip edge of paper to have an irregular one, I mark shape of the filter, on a filter I cut right at the battom of the filter, and a centimeter larger on two oblique sides, on other filter almost the same but we need a couple of centimeter at the bottom of the filter, and we will use them to connect two filters together, you can see better in next photoes


    you see, I glue two oblique tabs, streight one will be the one to connect at the other filter.

    before to glue on filter, I ink edge, other sides I will ink after sewing them on longer sides.


    This is the situation we have right now, and on the other side (see next photo)


    Ok now we have to cover other side too, and for next step we no need to cut paper leaving 1 cm from the mark of pencil, because we will cut on the mark, we wrapped filter in previous step. See in next photo.


    now we have to connect to the other filter, I glue tabs leaving a couple of millimeter between filters.


    Let's glue doilies on them and all we have to do is to embellish them with images, labels, stickers, and all we like. I make a sewing stitch as decoration and because glue stick is not a permanent glue.

    I saw them before to embellish pockets.


    edge of the filter are soft so I added inside a strip of paper shaped on the filter, to make they sturdy. I add here all photoes, I also added magnete. I will use some of these pocket as double pocket that hugs page, to add a journaling card or a tag underneath. 


    While I was waiting for the editing program to save the video I finished this other double pocket, also with a magnet. on the "smooth" side, on the opposite side (see last photo) I sewed pieces of paper as I showed you few videos and posts ago .On other side of the pockets I glued inside as I did in previous ones
     I wanted to share with you this idea too. kisses. Betty


    giovedì 16 novembre 2023

    Tasche per il journal realizzate con i filtri del caffè.


    Salve a tutti, a distanza di qualche giorno dal post che riguardava le embossing folder, che volevo sistemare da mesi, e finalmente ci sono riuscita 😁 Eccomi tornata con un post, relativo ad un video, che in realtà doveva uscire due mesi fa. Avevo registrato il video in inglese, ma devo dire che il mio inglese è molto incerto quindi mi fermo diverse volte, perché bisogna ricordare come si dica quella parola in inglese...
     In fase di editing del video ho visto che mancava tutta la parte finale della decorazione, oddio, avendo cambiato inquadratura per non far vedere sotto sopra a chi guarda, mi sono accorta che in molti punti ero fuori dall'inquadratura. Io non so davvero se tutti coloro che fanno video usano il telefono, io uso una videocamera e non riesco a trovare un cavalletto che mi permetta di sistemare la videocamera all'altezza della mia testa per permettere allo spettatore di vedere come se fosse al mio posto. 😕😔 Devo farvi vedere il cavalletto di fortuna che utilizzo in qualche video e che è di uno scomodo assurdo.

    Il procedimento in realtà è molto semplice ma ho fatto diverse prove. In video ho dovuto tagliare tantissimo, e la realizzazione di tutte le altre tasche ho evitato di registrarle, pensate che per questo avevo files per 1h e 35minuti circa, poi tra parti tolte e parti velocizzate sono arrivata a 43 minuti circa.

    All'inizio avevo sovrapposto leggermente le tasche e con gli strati successivi di carta diventavano troppi strati e non si piegava, allora ho messo pari e ho sovrapposto solo la carta da libro ma era ancora troppo spesso, il terzo tentativo è quello che vi mostro nel video. Non è la terza tasca, perché poi vedrete le foto dopo, quelle che vedete singole sono il primo tentativo, e poi alla fine vedrete quelle che sono già nel journal ma il terzo tentativo è stato quello che ha deciso come fare tutte le altre. Diciamo così.

    Avevo preso questi filtri del caffè un sacco di tempo fa, avevo fatto delle prove tra cui una sorta di mini album, no è un'offesa per gli album, erano 5 filtri messi insieme ricoperti con della carta scrap e delle tags all'interno del filtro, fatto con la spirale di platica della rilegatrice del Lidl, che è ottima per rilegare le fotocopie per gli appunti ecc, ma per questo tipo di lavori proprio no... a parte che litigo con la parte che fora... ma son dettagli. Comunque non lo ultimai neanche, rimasto nella scatola dei "poi vediamo" (dove lascio da parte le creazioni che non mi piacciono in attesa di un'idea che possa "salvarla" dalla spazzatura) niente l'ho buttato via quando ho rinnovato la stanza creativa.

    Qualche tempo dopo ho trovato un video di Treasure Books che utilizzava i filtri del caffè per creare delle tasche e ne realizzai un po', era nel 2021. 

    Ultimamente sto lavorando ad un Journal a tema fate, anche se mi sono fermata a causa di quello che io chiamo "aspettativa Vs risultato" non mi convince tantissimo, lo vedo povero elementi interessanti, avrei dovuto aggiungere qualche pagina messa in un modo particolare, aggiungere altri tipi di carta e altri elementi, nel video mostro un po' il journal, la corteccia sulla copertina è probabilmente inusuale e particolare, ho aggiunto le luci, e non credo che una pazzia così sia venuta in mente a molte... unico inconveniente è che la corteccia è fragile e quindi tende a rompersi, per ovviare a questo problema ho dato una mano di colla vinilica e credo che darò anche una mano di vernice vellutata per renderla nuovamente opaca... Diciamo che i motivi che mi hanno fermata dono diversi, ma torniamo alle tasche.

     Sistemando spesso mi vengono idee, infatti ho trovato la confezione di filtri e ho detto "quelle di Treasure books sono orizzontali, ma a me nel journal servirebbero verticali, si ma come le aggiungo? E se le rendessi "rilegabili"? Ecco come ho pensato di creare queste pagine/tasca per i Journal.

    Nel video ne mostro anche una versione con calamita che si può aggiungere nella pagina prima di quella centrale o aggiungere la calamita sulla pagina dopo oppure non includerla nella rilegatura ma usarla come una doppia tasca che "abbraccia" la pagina, ossia la parte unita esternamente un po' la stessa funzione delle paper clips per intenderci. 

    Di cosa abbiamo bisogno:

    • due filtri del caffè
    • timbri o stancils
    • tampone inchiostro (io uso StaZon o Archival)
    • distress ink
    • carta da libro o carta pattern, o carta digitale 
    • centrini di carta
    • colla stick e colla vinilica
    • macchina da cucire (facoltativa)
    • immagini, stickers, etichette, frasi, merletti, nastrini, paste ecc. Quello che vi suggerisce la fantasia per abbellire la tasca in base al journal dove andrà la tasca.
    • calamite oppure anche una chiusura diversa ad esempio un  nastrino... 
    Io nel primo tentativo che ho fatto (quello con molti strati che poi ho diviso in due tasche separate), ho usato uno stancil su entrambi i lati per decorare un po' la tasca, nel video timbro un po' qua e là.


    Come potete vedere si intravede un orologio sullo sfondo e sull'altro lato dei cuori...  Queste come dicevo prima erano unite ma troppo spesse non si chiudevano correttamente, quindi le ho separate e nel journal saranno una destra e una sinistra o aggiunta così con una clip oppure incollata su 3 lati per ottenere due tasche, potendo aggiungere qualcosa anche tra la pagina e la tasca. 


    Io procedo così:

    tasche con la cucitura nello stesso verso

    Inizio con il timbrare oppure a distressare con l'aiuto di uno stancil la parte più esterna del filtro, nel video ho timbrato.

    I filtri non sono identici ma da un lato è leggermente più largo mettendoli pari non coincidono quindi preferibilmente mettete le cuciture dei filtri nello stesso verso. Nel video non ho messo pari quando ho applicato le calamite e ho dovuto sistemare dopo, ma le tasche erano messe nel verso giusto.

    In seguito aggiungo la carta da libro o la carta digitale, io ho usato della carta di un blocco acquistato da Shein.

    Il procedimento è un attimo complesso da spiegare, ma davvero semplice da eseguire, spero che con le prossime foto possa essere più semplice, anche se non avete visto il video possiate capire bene come ho fatto.
    Strappo la pagina in modo da avere un bordo non dritto e invecchio il bordo, mi segno con la matita la sagoma del filtro e per una metà vado pari sul fondo ma lascio un 1-1,5cm per avvolgere il filtro sull'altro lato, e poi dal lato opposto taglierò semplicemente una sagoma pari da tutti e 3 i lati.

    Nella foto successiva vedete meglio...


    Invece per l'altro filtro lascio un paio di cm sul fondo per collegarlo poi con il filtro ricoperto prima, dall'altro lato lascio sempre i 2 cm sul fondo ma pari come ho fatto prima.
    Qui vedete il lato con aletta e quello pari prima di aggiungere il lato "B". Quello che nella foto vedete a sinistra andrà tagliato pari da tutti e 3 i lati, mentre quello che vedete a destra pari in alto e in basso ma lascio sul fondo i 2 cm.

    In questo modo, vedete? 
    Non ci resta che collegare le due parti lasciando un paio di millimetri tra una tasca e l'altra per facilitare la chiusura della stessa
    Qui vedete la parte del lato "B" della metà in cui la carta va pari al filtro.


    Dettaglio delle alette che "abbracceranno" il filtro senza alette, vedi foto successiva

    Come potete vedere nella foto in alto lascio un paio di millimetri. 
    Qui a sinistra vedete le due tasche collegate e con i centrini, che adesso andrò ad incollare.

    Da qui in poi decorate a piacere con immagini, etichette e quant'altro vi suggerisca la vostra fantasia, di seguito vi lascio le foto delle altre tasche fatte, anche quelle che nel video vi mostro già all'interno del Journal.

    Per mostrarvi in foto i vari step, ne ho iniziata un'altra di tasca, anzi tasche.


    Questa è già nel Journal, come potete vedere è a tema Fate, la foto a sinistra (blu) l'ho stampata con la stampata con la mini stampante termica.

    Dimenticavo di dirvi che per rendere più rigido il bordo ho creato una specie di fascetta che in video mostro come inserire all'interno della tasca, In questa tasca le avevo messe esternamente e tagliato con delle forbici decorative, era troppo complesso da fare quindi per le altre ho aggiunto queste fascette all'interno della tasca. Facoltativo come passaggio, così come il punto a macchina.
    Io amo il punto a macchina, come ho sempre detto lo trovo molto decorativo.


    Per creare la fascetta di cui vi parlavo prima ho preso il filtro e ho tracciato il contorno esterno e 1,5 di spessore ho ritagliato e incollato su un cartoncino e ho creato la dima con cui tagliare tutte le fascette da incollare internamente alla tasca, ma nessuno vi vieta di aggiungerla fuori, solo che esternamente si deve trovare il modo di renderla più carina, decorandola con colori o timbrate o tagliarla con delle forbici decorative, credo che proverò a fare dei raffle di carta come vi ho mostrato qualche video fa solo che anzicchè usare una fascia dritta come base potrei usare la fascia che va all'interno... si potrebbe essere un'idea...

    Anche queste tasche sono nel Journal, la preferisco alla precedente, è più semplice... voi che ne dite?

    Queste tasche le ho realizzate nel video, come dicevo prima avendo spostato la videocamera da un lato si vede meno, ma già so in quale journal aggiungere queste tasche.


    Da un lato ho aggiunto i centrini invecchiati con il caffè dall'altro bianchi, per creare un po' di contrasto. 


    Anche questa andrà nello stesso journal dove andrà quella che vi ho mostrato poco prima...


    Ecco questa l'avevo registrata a settembre ma mancava tutta la parte della decorazione, e avevo registrato in inglese. 
    Dove sia finita la parte di video dove decoravo? 
    Non ne ho idea, ero sicura di aver registrato, invece no. 


    E questa è con le calamite. L'altra la ultimerò e poi magari aggiungo la foto in seguito. Per adesso è tutto, spero che vi piacciano e che sia un'idea simpatica per utilizzare i filtri del caffè, che ripeto io ho acquistato a scopo creativo.

    Quelle realizzate seguendo il tutorial, le uso come buste per adesivi, ritagli ed ephemera vari. Nel pacco che sto per spedire adesso ad esempio ho aggiunto delle carte e delle paper clips e degli adesivi 😃

    Un forte abbraccio. Buona creatività a tutti. Con affetto Betty.

    Mentre attendevo che il programma di editing salvasse il video ho terminato quest'altra doppia tasca, anche questa con calamita. dal lato "liscio" invece dal lato opposto (vedi ultima foto) ho cucito sulla fascetta, che nelle altre ho incollato internamente, dei pezzi di carta come ho mostrato qualche post fa e nel canale YouTube trovate il video dei ruffle di carta.
    Niente volevo condividere con voi un'ulteriore idea. Baci.