Hello everyone, a few days after the post about the embossing folders, I wanted find a way to store them at the best, and I finally succeeded 😁 Here I am back with a post,about a video, which I should have to edit and to upload two months ago. I had recorded the video in English, but I must say that my English is very uncertain so I stop several times, because you have to remember how to say that word in English...
While editing the video I saw that the entire final part of the decoration was missing, oh my God, having changed the shot so as not to let the viewer see upside down, I realized that in many places I was out of the frame. I really don't know if everyone who makes videos uses the phone, I use a video camera and I can't find a tripod that allows me to place the camera at my head level to allow the viewer to see as if he were in my place . 😕😔 I have to show you the makeshift easel that I use in some videos and which is uncomfortable.
The process is actually very simple but I did several tests. On video I had to cut a lot, and I avoided recording the creation of all the other pockets, consider that for this reason I had files for around 1 hour and 35 minutes, then between parts removed and parts sped up I reached around 43minutes.
At the beginning I had slightly overlapped the pockets and with the subsequent layers of paper they became too many layers and it wouldn't fold, so I overlapped the book paper but it was still too thick, the third attempt is the one I show you in video. It is not the third pocket, because then you will see the photos afterwards, the single ones you see are the first attempt, and then at the end you will see the ones that are already in the journal but the third attempt was the one that decided how to do all the others. Let's say so.
I had taken these coffee filters a long time ago, I had done some attempt including a sort of mini album, no it's an insult to albums, they were 5 filters put together covered with scrap paper and tags inside the filter, made with the plastic spiral of the Lidl binding machine, which is excellent for binding photocopies for notes etc. but not really for this type of work... However, I didn't even finish it, it remained in the "we'll see" box (where I leave aside the creations that I don't like waiting for an idea that can "save" it from the garbage) I threw it away when I renovated the room creative.
Some time later I found a video from Treasure Books that used coffee filters to make pockets and made some, this was in 2021.
Lately I've been working on a fairy themed Journal, even though I stopped because of what I call "expectation vs result" it doesn't convince me very much, I should add interesting elements, I should have added a few pages put in a particular way, add other types of paper and other elements, in the video I show a bit of the journal, the bark on the cover is probably unusual and particular, I added the lights, and I don't think that a madness like this has occurred to many... the bark is fragile and therefore tends to break, to overcome this problem I applied a coat of vinyl glue and I think I will also apply a coat of velvet varnish to make it opaque again... Let's say that the reasons that stopped me give different, but let's go back to the pockets.
I found the pack of filters and I said "those from Treasure books are horizontal, but I would need vertical ones in the journal, yes but how do I add them? What if I made in a way to be bind in the journals? Here's how I thought to create these pages/pockets for Journals.
In the video I also show a version with a magnet that can be added on the page before the central one or add the magnet on the page after or not include it in the binding but use it as a double pocket that "hugs" the page,
What do we need:
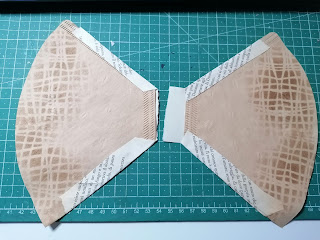
I rip edge of paper to have an irregular one, I mark shape of the filter, on a filter I cut right at the battom of the filter, and a centimeter larger on two oblique sides, on other filter almost the same but we need a couple of centimeter at the bottom of the filter, and we will use them to connect two filters together, you can see better in next photoes
Let's glue doilies on them and all we have to do is to embellish them with images, labels, stickers, and all we like. I make a sewing stitch as decoration and because glue stick is not a permanent glue.


Nessun commento:
Posta un commento